Background

Showing posts with label cooking. Show all posts

Sunday, March 4, 2012

Loving Temp-tations


I just bought my first set of Temp-tations stoneware bakers and I'm so excited to get them! 

Over the weekend, I went to visit my grandparents down south for my grandfather's 75th birthday.  It was a wonderful weekend, and I needed the getaway!  My favorite aunt was there and she corrupted me by introducing me to QVC.  If you don't know what QVC is (I didn't!), it's that channel you always flip past that's always selling something whether it's housewares, jewelry, handbags, clothes, shoes, or even garden stuff.  I don't have cable, but I do have the internet and they have a website!  QVC.com

This aunt also introduced me to Temp-tations stoneware.  She arrived with yummy baked mac'n'cheese in her stoneware baker and brought my grandmother a Temp-tations oval baker that has a lid shaped like a rooster!  It was really cute.  What sold me on stoneware was the versatility of it.  You can bake, serve, and store in it.  It's microwave, dishwasher, oven, fridge, and freezer safe.  Holy crap!


I'd told my mom I needed at least one casserole dish and I also need some baking pans that I can make cakes or brownies in.  I have cookie sheets and I have one glass loaf pan.  Nicki suggested I check out QVC.  She said no matter where she looked, QVC had the lowest price around.

So I arrived home and almost immediately found a set I love and I'm now waiting for it to be shipped to my door!  Yay!

Tuesday, December 13, 2011

Homemade Vanilla Extract

Pictures really are worth a thousand words.


Did you know you can make your own vanilla extract at home?  Yea, and for the amount you can make, it's actually a lot cheaper by volume to just do it yourself!  Plus, you'll practically never run out, and it's fun!

According to DIY Natural, homemade vanilla extract is way more cost effective, and they break it down this way:

She made 76 ounces of vanilla extract using 3 – 750ml bottles of vodka and 1/4lb of vanilla beans, which provided the following savings:


Store bought cost
One 2 ounce bottle of store brand pure vanilla extract cost $4.99.  Total cost = $2.50/ounce.

Homemade cost
3 bottles of vodka (750ml) cost $10 each for a total of $30.  750ml x 3 = 2250ml which is equivalent to 76 ounces.  1/4lb of vanilla beans (approximately 36 beans) is equivalent to 4 ounces and cost $10.    Based on these calculations, 76 ounces of pure vanilla extract cost $40.  Total cost = $0.50/ounce.  Imitation vanilla cost approximately $1.00/ounce.  This reveals that homemade vanilla extract is 5 times cheaper than store bought pure vanilla and twice as cheap as imitation vanilla.


Now, those numbers all come from the article I linked to above.  I bought my vanilla beans at Fresh Market for $7.99 for 3 beans (yea, vanilla beans are expensive!) and I bought 6 beans for a total of $15.98 before tax.  I've bookmarked an eBay store that has better prices on vanilla beans.

I already had the vodka at home.  I used Smirnoff Vanilla Vodka (like I said, it's what I had at home), but all the recipes I've seen have said to use plain vodka, or anything that is at least 80 proof (or 40% alcohol) like rum or bourbon.  Rum has been said to make gluten free vanilla extract.

750ml of ABSOLUT vodka at Publix is $19.99, and a less expensive vodka is SVEDKA vodka for $13.99 for the same amount.
750ml = about 25.36 US oz making the ABSOLUT $0.79/oz and the SVEDKA $0.55/oz

Since I used vodka I already had, I'm going to calculate based off of the more expensive vodka I priced at the store.  Having said that, my total cost for making my vanilla extract would be $35.97 before tax, making my finished vanilla extract $1.42/oz.  If I'd used the cheaper vodka, it would've come out to $1.18/oz.

The cheapest pure vanilla extract I could find was the store brand at $2.50/oz before tax.


So, a list of what you'll need:

  • A bottle (750ml) of vodka or other 80 proof alcohol
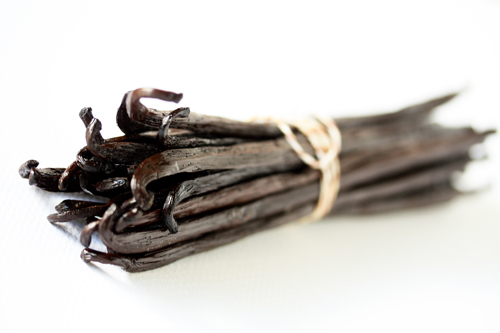
  • Vanilla beans (how many is up to you; from my research it appears that people who used less beans were just as successful as people who used more per volume of alcohol.  I used 6 beans.)
  • You can use the bottle your alcohol came in or you can buy your own bottles to make smaller portions for gifts and whatnot.  I first saw dark bottles suggested, but many people have used clear bottles and have found just as successful results.

  • Patience.  The initial process only takes about 20-40 minutes, but then you have to wait.  Vanilla extract takes 4-6 months to mature.  You can begin using it after 4-6 weeks, replacing the amount you use with more alcohol so your extract goes farther, but after 4-6 months you can strain the vanilla beans from the extract and use it for a very long time after that.  Vanilla extract also ages like a fine wine: the older it gets the better it is.  You can have the same 750ml bottle of vanilla extract for over a decade and it just keeps getting better!


When you take your vanilla beans out, you'll want to split them long-ways with a knife.  They should look something like this:


You can either cover them with vodka in a bottle like that, or you can do an extra step.  Some recipes suggest scraping the black stuff out of the bean, like so:


You can then chop up the husk of the bean and put both the scraped out bits and the chopped up bits in the vodka.  I'm hypothesizing that this just makes it so the vodka doesn't have to work as hard to extract the vanilla essence from the beans.  I didn't do it this way, but I plan to try it when I do it again.

Once you've covered your beans with alcohol, tightly seal your bottle and shake the whole concoction.  Then, whip out your patience because you've got a whole lot of waiting to do!  You can shake your bottle daily if you can remember to (I forget!).


Once you've reached the 4-6 month mark and you've strained your extract from the beans, don't throw those beans away!  You can make vanilla sugar by burying those used beans in your sugar jar and shaking a bit.  How cool is that?


Tomorrow I'm planning on trying out homemade laundry soap.  I will post photos and the results!


Any input, comments, questions, or suggestions are always appreciated.  So let me know how your's turns out!

Monday, December 12, 2011

Homemade Garlic Oil

In future posts, I'll most likely post photography that's actually taken by me of my little home endeavors, but for today, and since I've already experimented without a camera handy, I'll use this image that I found off of google.

Garlic oil is great.  Olive oil lowers your LDL (bad cholesterol) and helps to raise your HDL (good cholesterol).  And guess what?  Garlic is good for lowering your bad cholesterol too!  Both are also good for fighting high blood pressure and both are documented as preventing some cancers.

I just found out that at age 22 I have high cholesterol (seriously?!) and high blood pressure runs in my family.  My mom has been concocting garlic oil for a few years now, and I kept asking her to make me some.  She finally did, and I finally learned to make it myself!

I've found through my research that there are a few ways to make garlic oil, and I've learned a new use for it as well!  Not only is garlic oil great on pastas and salads, but apparently it can help cure ear infections!  How crazy is that?


So, way-to-make-garlic-oil-number-one:

Jill's Home Remedies   On her blog, Jill of Jill's Home Remedies says to crush your garlic cloves and cover them with olive oil until you've got it 1 inch over your garlic. Leave it for 3 days, shaking your concoction each day, and then strain the garlic from the oil and store the oil in a bottle or jar.

To use this for ear infections, she suggests warming up the garlic oil, but not so much that it's hot, and place 2-4 drops in the affected ear 2 or 3 times a day.  She suggests laying on your side for 5-10 minutes so the oil doesn't run out of your ear.

According to a coworker of mine, this method of creating garlic oil is the "lazy woman's way" but I find I'd rather put forth the small amount of effort to have the oil in a shorter amount of time. I'm impatient!


And with that, way-to-make-garlic-oil-number-two:

This method goes with the picture I posted at the top of this post.  You literally cook the essence of the garlic into the oil.  You can buy cloves and peel them yourself, or you can buy the already peeled garlic.  The recipe suggests one clove of garlic to 1/2 cup olive oil.  You put the oil and garlic into your pot and bring it to a simmer.  Then, turn your heat down to low and let the garlic brown (10-20 minutes).  You don't want the garlic to burn, though.

With this recipe, you can use drizzle the oil and the cooked garlic over your food, yum!


Last, but certainly not least, way-to-make-garlic-oil-number-three:

This is my mom's method and the method I used.  When trying this recipe, I called my mom and asked her if there was a certain oil-to-garlic ratio I needed to abide by.  Her answer was, "Yea... a lot to a lot."  Thanks, mom.

I bought 0.75L cold-pressed artisan extra virgin olive oil from one of our nicer food markets in town: Fresh Market.  The garlic I got from Publix.  I used half of the bottle of peeled garlic, and all of the oil.

I put the oil and the garlic into my cast iron dutch oven, put that in my oven (no lid), and set it to 200.  My mom said not to let the oven pre-heat before putting the oil in to cook.  I left it for 20 minutes and then started checking it.  My mom said I'd know it was done when the garlic started to float.  Good thing I asked my mom for a time range!  She said to start checking it after 20-30 minutes, and that it should be done at about 45-60 minutes.

I waited for the garlic to float.  I don't think I had enough oil (next time I'll buy 2 bottles!) and the garlic never really went anywhere, but I left my oil in the oven for an hour and a half before finally taking it out and straining it.  It's still really good, so I guess I did something right!


If you try any of these and have any comments, suggestions, updates, or anything, please leave your input!